![[4 Types] How to Grow Corn in a Raised Bed](https://gardeningtab.com/wp-content/uploads/2024/10/4-Types-How-to-Grow-Corn-in-a-Raised-Bed-Maximize-Your-Yield.png)
How to grow corn in a raised bed? you have to choose a sunny location and prepare nutrient-rich soil. Plant seeds 1-2 inches deep, spacing them 6-12 inches apart.
Growing corn in a raised bed can be a rewarding experience. This method allows for better soil drainage and control over soil quality. Corn thrives in warm weather and needs full sun exposure for optimal growth. Raised beds also make it easier to manage weeds and pests.
For the best results, use high-quality soil enriched with compost. Plant corn seeds in spring after the last frost for a bountiful harvest. Ensure regular watering, especially during dry spells, to support healthy growth. With proper care, you can enjoy fresh, homegrown corn from your garden.
Benefits Of Raised Beds
Growing corn in a raised bed offers many benefits. Raised beds create an ideal environment for corn. They help control soil conditions, making it easier to grow healthy plants. With raised beds, gardeners can enjoy better yields and less hassle. Let’s explore the key benefits of using raised beds for corn.
Improved Drainage
One major benefit of raised beds is improved drainage. Corn plants thrive in well-drained soil. Poor drainage can lead to waterlogged roots, which harms growth. Raised beds help prevent this problem. Here’s how:
- Elevated soil: The height allows excess water to flow away easily.
- Looser soil: Raised beds often use a mix of soil that allows air and water to move freely.
- Less compaction: Walking around the beds keeps the soil from getting too packed down.
Consider the following table that highlights the difference in drainage between traditional and raised beds:
| Feature | Traditional Bed | Raised Bed |
| Soil Elevation | At ground level | Elevated above ground |
| Water Retention | Can retain too much water | Drains excess water quickly |
| Root Health | Risk of rot | Healthier roots |
With improved drainage, corn plants can grow strong and healthy. This leads to better harvests and fewer problems for gardeners.
Easier Maintenance
Raised beds make maintenance easier for gardeners. Working in raised beds is convenient and less strenuous. Here are some key points:
- Accessible height: No bending over is needed. This reduces back strain.
- Defined space: Corn plants have their own area. Weeds are easier to spot and remove.
- Controlled environment: You can quickly adjust soil quality and nutrients.
Routine tasks become simpler in raised beds. For example:
- Watering: It’s easy to reach the plants without bending.
- Weeding: Less time is spent on hands and knees.
- Harvesting: Picking corn is simple and quick.
Overall, raised beds save time and effort. Gardeners can focus on enjoying their corn rather than struggling with maintenance. This makes the gardening experience more enjoyable and productive.
Credit: howmytexasgardensgrow.com
How to Grow Corn in a Raised Bed: Choosing The Right Location
Growing corn in a raised bed can be a fun and rewarding experience. Choosing the right location for your raised bed is crucial. The right spot ensures your corn gets enough sunlight and protection from harsh winds. These factors help your corn grow tall and healthy.
Sunlight Requirements
Corn loves sunlight. It needs at least 6 to 8 hours of direct sunlight each day. Without enough light, your corn may not grow well. Here are some tips to find the perfect sunny spot:
- Observe your yard throughout the day.
- Look for areas that stay sunny for long periods.
- Avoid shaded spots from trees or buildings.
Consider using a sunlight chart to help you track sunlight hours. You can create a simple table:
| Location | Morning Sun | Afternoon Sun | Total Sunlight |
| Near the Fence | 4 hours | 3 hours | 7 hours |
| Under the Tree | 2 hours | 1 hour | 3 hours |
| Open Field | 6 hours | 5 hours | 11 hours |
Choose a spot with at least 6 hours of sunlight. This will help your corn grow tall and strong.
Wind Protection
Wind can damage corn plants, especially young plants. Strong winds can break the corn stalk or knock the plant over. Protecting your corn from wind is essential. Here are some ways to do it:
- Plant your raised bed near a building or fence for natural windbreaks.
- Use tall plants as barriers, like sunflowers or beans.
- Consider installing a windbreak made of burlap or mesh.
Plan the layout of your garden to minimize wind exposure. You can also create a wind direction map:
| Wind Direction | Recommended Barriers |
| North | Plant sunflowers |
| East | Build a fence |
| West | Use tall grasses |
| South | Plant shrubs |
Choose the right wind protection for your area. This will help your corn thrive and grow tall.
Selecting Corn Varieties
Growing corn in a raised bed can be a rewarding experience. One key step is selecting the right corn variety. Different types of corn thrive in various conditions. Knowing which variety suits your needs helps ensure a successful harvest.
Sweet Corn
Sweet corn is a favorite for many gardeners. It is known for its tender, sugary kernels. This type of corn is perfect for fresh eating and can be canned or frozen for later use. Sweet corn typically requires a sunny spot and well-drained soil.
Here are some popular sweet corn varieties:
- Silver Queen: A classic white variety.
- Golden Bantam: An heirloom variety with rich flavor.
- Honey Select: A hybrid with a sweet taste.
When planting sweet corn, follow these tips:
- Space plants 12 inches apart.
- Plant in blocks for better pollination.
- Water consistently, especially during dry spells.
Field Corn
Field corn is mainly grown for livestock feed and industrial uses. Unlike sweet corn, it has a higher starch content. This type of corn is not typically consumed fresh. Instead, it is processed into products like cornmeal and syrup.
Field corn varieties include:
- dent corn: Commonly used for animal feed.
- flint corn: Known for its hard kernels.
- sweet corn: While mainly for eating, it can also be used for various products.
Field corn grows tall, so ensure ample space. Here are tips for growing:
- Plant in rows 30 inches apart.
- Use fertilizers high in nitrogen.
- Monitor for pests and diseases.
Popcorn
Popcorn is a fun variety that kids love. It is a special type of corn that pops when heated. Popcorn kernels have a hard outer shell that holds steam until it bursts open.
Popular popcorn varieties include:
- Butterfly: Light and fluffy texture.
- Mushroom: Round shape, perfect for coatings.
- White: Tender and white when popped.
For the best results, follow these planting tips:
- Plant seeds 1 inch deep.
- Space them 6 inches apart.
- Harvest when kernels are hard and dry.
Flint Corn
Flint corn is known for its colorful kernels. It has a hard outer shell and is often used for decoration. This type of corn is also used for making cornmeal and polenta.
Flint corn varieties come in many colors:
- Red: Vibrant and striking.
- Blue: Unique and flavorful.
- Yellow: Traditional choice for many recipes.
Here are some tips for growing Flint corn:
- Provide full sunlight.
- Space plants 12 inches apart.
- Harvest when ears are dry and hard.
Preparing The Raised Bed
Growing corn in a raised bed is a fantastic way to enjoy fresh, homegrown vegetables. Preparing the raised bed is crucial for a successful corn crop. This process includes choosing the right soil and setting proper dimensions. Let’s dive into the details!
Soil Composition
The right soil is key to growing healthy corn. Corn needs nutrient-rich soil that drains well. Here are some important components for your raised bed soil:
- Topsoil: Use high-quality topsoil as the base.
- Compost: Add organic compost to improve fertility.
- Peat Moss: This helps retain moisture.
- Sand: Mix in sand for better drainage.
A great mix for corn may look like this:
| Component | Percentage |
| Topsoil | 50% |
| Compost | 30% |
| Peat Moss | 10% |
| Sand | 10% |
Mix these components well in your raised bed. Testing your soil is also helpful. You can buy a simple soil test kit. This will show if your soil is too acidic or alkaline. Aim for a pH around 6.0 to 6.8 for the best results.
Raised Bed Dimensions
The size of your raised bed matters for growing corn. Corn plants can grow tall, so space is vital. Aim for a bed that is at least 4 feet wide. This width allows easy access for planting and maintenance.
The length of the bed can vary based on your space. A good starting point is 6 to 8 feet long. Here are some important points about bed dimensions:
- Height: Raised beds should be at least 12 inches high.
- Spacing: Space corn plants about 12 inches apart.
- Rows: Create rows that are about 30 inches apart.
Here’s a quick reference table for bed dimensions:
| Dimension | Recommended Size |
| Width | 4 feet |
| Length | 6-8 feet |
| Height | 12 inches |
| Plant Spacing | 12 inches apart |
| Row Spacing | 30 inches apart |
With the right bed dimensions, your corn will have the space it needs to thrive. Prepare your raised bed carefully to enjoy a bountiful harvest!
Planting Corn Seed
Growing corn in a raised bed is a fun and rewarding gardening project. Planting corn seeds correctly ensures healthy plants and a bountiful harvest. Corn needs space to grow, and proper planting depth is essential for strong roots. Follow these guidelines for successful planting.
Spacing Guidelines
Proper spacing is vital for corn plants. If they are too close, they won’t get enough sunlight or air. Here are key spacing tips:
- Space seeds 12 to 15 inches apart.
- Rows should be 24 to 36 inches apart.
- For sweet corn, plant at least 4 rows for better pollination.
Use the following table for quick reference:
| Type of Corn | Seed Spacing | Row Spacing |
| Sweet Corn | 12-15 inches | 30 inches |
| Field Corn | 15-20 inches | 36 inches |
| Popcorn | 12-18 inches | 30 inches |
Following these spacing guidelines helps your corn plants thrive. Remember, good air circulation and sunlight are key to healthy growth.
Depth Of Planting
Planting depth affects the germination of corn seeds. Correct depth ensures the seeds can access moisture and nutrients in the soil.
Follow these depth guidelines:
- Plant seeds 1 to 2 inches deep.
- For heavier soils, plant closer to 2 inches.
- In lighter, sandy soils, aim for 1 inch.
- Dig a small hole with your finger or a tool.
- Drop in the seed and cover it lightly with soil.
- Water gently to settle the soil.
Watch for germination after planting. Seeds typically sprout within 7 to 10 days, depending on temperature and moisture. Check the soil regularly to keep it moist but not soggy. Proper planting depth leads to strong, healthy corn plants.
Watering Techniques
Growing corn in a raised bed is rewarding and fun. Proper watering techniques are crucial for a healthy corn crop. Watering ensures your plants receive enough moisture. This section covers important aspects of watering corn in raised beds.
Soil Moisture
Maintaining the right soil moisture is vital for corn. Corn plants need consistent moisture, especially during their growth stages. Here are some key points to remember:
- Check the soil regularly.
- Use your finger to test the moisture level.
- Soil should feel damp but not soggy.
Ideal soil moisture promotes strong root growth. Too much water can lead to root rot, while too little can stunt growth. Here’s a simple table showing moisture levels:
| Moisture Level | Effect on Corn |
| Too Wet | Root rot and stunted growth |
| Just Right | Healthy growth and strong roots |
| Too Dry | Wilting and poor yield |
Keep an eye on the weather, too. Rainfall can affect moisture levels. Use mulch to retain soil moisture. Mulching helps reduce evaporation, keeping the soil moist longer.
Irrigation Methods
Choosing the right irrigation methods is essential for growing corn. Various techniques can help you provide consistent water. Here are some popular methods:
- Drip Irrigation: Delivers water directly to the roots.
- Soaker Hoses: Soaks the soil slowly and evenly.
- Sprinklers: Provides a wide coverage area.
Drip irrigation is efficient and conserves water. It targets the roots, allowing for deep watering. Soaker hoses are easy to install and maintain soil moisture. Sprinklers work well for larger areas but may lead to water waste.
Consider these factors when selecting an irrigation method:
- Size of your raised bed.
- Budget for irrigation supplies.
- Time available for watering.
Set up a watering schedule based on the weather. Water in the morning or evening to avoid evaporation. Consistent watering leads to healthy corn plants.
Fertilizing Corn
Growing corn in a raised bed is a fun and rewarding experience. Fertilizing corn is key to achieving healthy plants and a great harvest. Corn needs nutrients to grow tall and produce sweet ears. Using the right fertilizer helps your corn thrive. Let’s explore some great options for fertilizing your corn.
Organic Options
Organic fertilizers are a fantastic choice for growing corn. They provide essential nutrients while being kind to the environment. Here are some popular organic options:
- Compost: Rich in nutrients, compost improves soil structure.
- Manure: Well-rotted manure adds nitrogen fertilizer and other nutrients.
- Bone Meal: Provides phosphorus, promoting root growth.
- Fish Emulsion: A liquid fertilizer high in nitrogen, great for leafy growth.
- Kelp Meal: Adds trace minerals and helps with stress tolerance.
Consider using a mix of these organic fertilizers. Here’s a quick table showing the nutrient content of common organic fertilizers:
| Fertilizer Type | Nitrogen (%) | Phosphorus (%) | Potassium (%) |
| Compost | 1-3 | 1-2 | 1-2 |
| Manure | 0.5-2 | 0.5-1 | 0.5-1 |
| Bone Meal | 0-4 | 10-15 | 0-1 |
| Fish Emulsion | 5-7 | 1-2 | 0-1 |
| Kelp Meal | 1-2 | 1-2 | 2-3 |
Using organic fertilizers not only helps your corn but also enhances the overall health of your soil. Healthy soil leads to better plants and more delicious corn.
Timing Of Application
The timing of fertilizer application is crucial for corn growth. Start by testing your soil before planting. This gives you a clear idea of nutrient needs. Apply fertilizers at the right times for best results.
- Pre-Planting: Add compost or manure to your raised bed about two weeks before planting. This allows nutrients to mix into the soil.
- At Planting: Apply a balanced organic fertilizer during planting. This gives corn a nutrient boost as it starts to grow.
- Side-Dressing: About 4-6 weeks after planting, side-dress with fish emulsion or another nitrogen source. This supports healthy leaf growth.
- Before Tasseling: Apply additional organic fertilizer if your corn looks pale or weak. This helps during the crucial flowering stage.
Follow these timing guidelines for optimal corn growth. Consistent fertilizing leads to tall plants and sweet ears of corn. Happy gardening!
Pest Management
Pest management is vital for growing healthy corn in a raised bed. Pests can destroy your plants, leading to poor yields. Identifying these pests early helps in managing them effectively. Use safe methods to protect your corn without harming the environment.
Common Pests
Several pests can threaten your corn crop. Being aware of them helps in taking quick action. Here are some of the most common pests:
- Corn Earworm: These pests eat the kernels, affecting the yield.
- Cutworms: They cut young plants at the base, causing them to fall.
- Aphids: Small bugs that suck sap from the plants, weakening them.
- Spider Mites: Tiny arachnids that cause yellowing and speckling on leaves.
| Pest | Signs of Infestation | Damage |
| Corn Earworms | Damaged kernels and corn silk | Reduced yield |
| Cutworms | Plants cut at the base | Plant death |
| Aphids | Sticky residue and curled leaves | Weak plants |
| Spider Mites | Yellowing leaves and webbing | Stunted growth |
Regularly check your corn for these pests. Early detection helps in minimizing damage.
Organic Solutions
Using organic solutions is effective for pest management. These methods are safe for the environment and your health. Here are some ways to keep your corn healthy:
- Neem Oil: This natural pesticide disrupts pests’ life cycles.
- Insecticidal Soap: Kills soft-bodied insects like aphids.
- Companion Planting: Grow plants like marigolds to repel pests.
- Handpicking: Remove pests like corn earworms by hand.
Consider using beneficial insects, such as ladybugs. They eat aphids and other harmful pests. Maintaining a balanced ecosystem in your raised bed helps control pest populations naturally.
Regular monitoring is essential. Check your corn plants weekly for any signs of pests. Taking action quickly ensures a healthy and productive corn crop.
Weed Control Strategies
Growing corn in a raised bed is rewarding. It allows better control of soil quality and drainage. Weed control is vital for healthy corn plants. Weeds compete for nutrients, water, and sunlight. Using effective strategies will help keep your raised bed thriving.
Mulching Techniques
Mulching is one of the best ways to control weeds in your raised bed. It creates a barrier that blocks sunlight, which weeds need to grow. Organic mulch also enriches the soil as it breaks down. Here are some effective mulching materials:
- Straw: Light and easy to spread.
- Wood chips: Long-lasting and effective.
- Grass clippings: Free and nutrient-rich.
- Leaves: Decomposes well and adds nutrients.
To apply mulch:
- Clear the area of weeds.
- Spread a layer of mulch 2-4 inches thick.
- Keep mulch away from the corn stems.
Here’s a simple table showing the benefits of different mulching materials:
| Material | Benefits |
| Straw | Lightweight, easy to handle |
| Wood chips | Lasts longer, suppresses weeds |
| Grass clippings | Rich in nutrients, easy to find |
| Leaves | Cost-effective, improves soil |
Regularly check the mulch layer. Replenish it as it breaks down to maintain its effectiveness.
Manual Removal
Manual removal is another effective way to control weeds. This method involves pulling weeds by hand. It is simple and does not harm the environment. Here’s how to do it:
- Wear gardening gloves for protection.
- Remove weeds early in the morning or after rain.
- Pull weeds from the root to prevent regrowth.
Set a schedule for manual removal:
- Check your raised bed weekly.
- Remove any weeds as soon as you spot them.
- Dispose of weeds properly to prevent spreading.
Keep track of your weeding efforts in a simple table:
| Week | Action |
| 1 | Check for weeds |
| 2 | Remove any found |
| 3 | Inspect again |
Stay consistent with manual removal. It helps keep your corn plants healthy and strong.
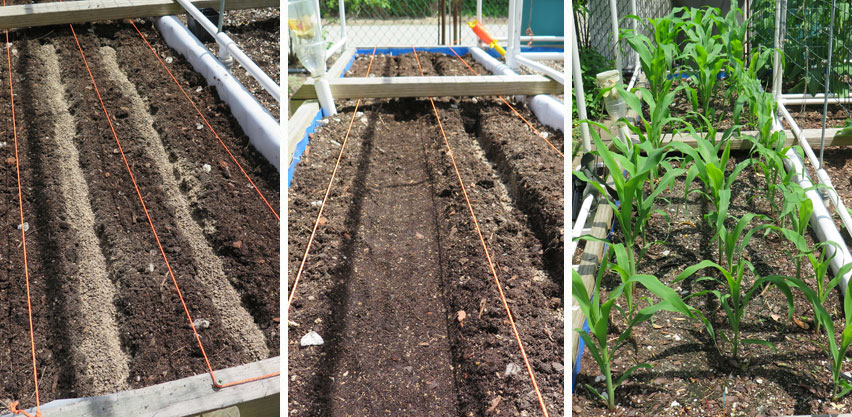
Credit: albopepper.com
Supporting Corn Plants
Growing corn in a raised bed can be a fun and rewarding experience. Supporting corn plants is essential for their growth and health. Corn can grow tall and heavy. Without proper support, plants may bend or break. Using the right support methods helps your corn thrive. Let’s explore effective ways to support your corn plants.
Staking Methods
Staking is a simple way to support your corn. It helps keep the plants upright, especially in windy conditions. Here are some easy staking methods:
- Single Stakes: Use wooden or metal stakes. Place one stake next to each corn plant.
- Row Stakes: Drive stakes along the row of corn. Connect them with strong twine.
- Cross Staking: Create an X shape with stakes. This method adds extra support.
Follow these steps for effective staking:
- Choose sturdy stakes at least 5 feet tall.
- Place the stake into the soil next to the plant.
- Use soft ties to gently attach the corn to the stake.
Here’s a simple table to remember the types of stakes:
| Staking Method | Best For |
| Single Stakes | Individual plants |
| Row Stakes | Multiple plants |
| Cross Staking | Windy areas |
Using these methods will keep your corn plants strong and healthy.
Caging Corn
Caging corn is another effective support method. Cages provide a strong structure for the plants. They protect corn from strong winds and heavy rain. Here’s how to create a cage:
- Materials: Use metal fencing or chicken wire. Choose a height of 4 to 5 feet.
- Shape: Create a circular or square cage around each corn plant.
- Secure: Make sure the cage is stable in the ground.
Follow these steps to cage your corn:
- Cut the fencing to the desired height.
- Form it into a circle and secure the ends.
- Place the cage around the plant, pressing it into the soil.
Benefits of caging corn:
- Stability: Keeps plants upright.
- Protection: Shields from pests and animals.
- Airflow: Allows better air circulation around plants.
Caging your corn plants is a great way to ensure they grow tall and healthy.
Monitoring Growth Stages
Growing corn in a raised bed is a fun and rewarding experience. Monitoring growth stages is key to success. It helps ensure your corn plants thrive. Understanding these stages can make growing corn easier and more enjoyable. You’ll know when to water, fertilize, or protect your plants.
Seedling Stage
The seedling stage is crucial for corn plants. After planting, seeds germinate and sprout. This stage lasts about 2 to 3 weeks. During this period, proper care is essential. Here are important tips:
- Keep soil moist but not soggy.
- Provide at least 6 hours of sunlight daily.
- Thin corn seedlings to avoid overcrowding.
Watch for these signs in seedlings:
| Seedling Signs | Description |
| Green Leaves | Healthy seedlings have vibrant green leaves. |
| Strong Stems | Sturdy stems indicate good growth. |
| Root Development | Roots should be visible if you check the soil. |
Check for pests like aphids. Early detection can save your plants. Use organic pesticides if needed. Keep an eye on the weather too. Protect seedlings from strong winds or frost.
Maturity Indicators
Knowing when corn is mature helps with harvesting. Maturity usually occurs 60 to 100 days after planting. Look for these indicators:
- Silk turns brown and dry.
- Kernels feel plump when squeezed.
- Husk turns a yellowish-green color.
Here’s a simple checklist for maturity:
- Check silk color weekly.
- Feel kernels for firmness.
- Observe husk color changes.
Once you see these signs, it’s time to prepare for harvesting. Proper timing ensures the best flavor. Late harvesting can lead to tough, less tasty corn. Enjoy your bountiful harvest!
Harvesting Corn
Harvesting corn is an exciting part of growing it in a raised bed. Watching your plants grow tall and strong is rewarding. When it’s time to harvest, knowing the right signs and techniques helps you enjoy the best corn possible.
Signs Of Ripeness
Identifying when corn is ripe is crucial for the best taste. Here are some signs to look for:
- Silk Color: The silk at the top of the ear turns brown and dries out.
- Ear Firmness: The ear feels firm when squeezed gently.
- Kernel Appearance: Kernels are plump and juicy, not shriveled.
- Milk Stage: Press a kernel. If a milky substance comes out, it’s ready.
| Sign | What to Look For |
| Smooth Silk | Silk turns brown and dries up. |
| Firm Ears | Ears feel solid when squeezed. |
| Juicy Kernels | Kernels are plump, not dry. |
| Milk Stage | Kernel releases milk when pressed. |
Timing is important. Corn is usually ready 18-24 days after the silk appears. Check your corn regularly as the harvest time approaches. The sooner you harvest, the sweeter your corn will taste.
Harvesting Techniques
Proper harvesting techniques ensure you gather corn without damaging the plants. Here’s how to do it:
- Prepare Your Tools: Use a sharp knife or scissors.
- Check for Ripeness: Ensure the corn is ready using the signs listed above.
- Grab the Ear: Hold the ear firmly at the base.
- Twist and Pull: Gently twist the ear while pulling down. This breaks the stem easily.
After harvesting, store your corn properly:
- Keep It Cool: Place corn in a cool area.
- Use Quickly: Corn tastes best when eaten fresh.
Enjoy your fresh corn in salads, on the grill, or in your favorite dishes. Happy harvesting!
Storing Corn
Growing corn in a raised bed is fun and rewarding. After harvesting, storing corn correctly is vital. Proper storage keeps the corn fresh and tasty for longer. This section covers how to store fresh corn and various preservation methods.
Fresh Corn Storage
Storing fresh corn is essential for maintaining flavor and texture. Corn tastes best when eaten soon after harvest, but you can store it for a short time. Follow these tips for optimal storage:
- Keep corn in the husk until ready to use.
- Store in a cool, dark place.
- Avoid washing corn before storage.
For best results, consider the following table:
| Storage Method | Duration | Notes |
| Refrigerator | 1-3 days | Wrap in a damp cloth. |
| Cool Pantry | 1-2 days | Keep away from sunlight. |
| Freezer (unprocessed) | Not recommended | May lose quality. |
Check corn daily for any signs of spoilage. Use corn quickly for the best taste.
Preservation Methods
Preserving corn extends its shelf life. Several methods work well, depending on your preference. Here are popular preservation techniques:
- Canning: Process corn in jars for long-term storage.
- Freezing: Blanch corn before freezing for best flavor.
- Drying: Remove moisture to create cornmeal or snack products.
Canning is a great option for those who want to enjoy corn year-round. Follow these steps:
- Prepare corn by removing husks and silk.
- Cut kernels off the corn cob.
- Pack corn in sterilized jars.
- Seal and process in a pressure canner.
Freezing is another excellent method. It keeps corn sweet and crisp. Here’s how:
- Blanch corn for 4-6 minutes.
- Cool corn in ice water.
- Drain and pack in freezer bags.
Choose the method that fits your needs best. Enjoy your homegrown corn all year long!
Companion Planting Ideas
Growing corn in a raised bed is an exciting adventure. One effective way to boost your corn’s growth is through companion planting. This method involves pairing corn with certain plants that help each other thrive. By choosing the right companions, you can improve soil health, deter pests, and encourage pollination. Here are some tips on which plants work best with corn.
Beneficial Plants
Certain plants are excellent companions for corn. They can enhance growth and improve the overall yield. Here are some top choices:
- Beans: They fix nitrogen in the soil, benefiting corn.
- Squash: Its broad leaves provide shade and reduce weeds.
- Sunflowers: They attract pollinators and can act as windbreaks.
- Marigolds: They repel harmful pests like nematodes.
Here’s a simple table summarizing these beneficial plants:
| Plant | Benefit |
| Beans | Fixes nitrogen |
| Squash | Provides shade |
| Sunflowers | Attracts pollinators |
| Marigolds | Repels pests |
Planting these companions around your corn can lead to a healthier and more productive garden. They help each other grow strong and robust.
Avoiding Conflicts
Not all plants make good companions. Some can hinder corn growth. It’s important to avoid planting certain plants with corn. Here are some plants to steer clear of:
- Tomatoes: They attract pests that could harm corn.
- Potatoes: They compete for nutrients and can spread diseases.
- Carrots: They may stunt corn growth.
Understanding plant relationships is crucial. Here’s a quick reference table for plants to avoid:
| Plant | Reason to Avoid |
| Tomatoes | Attracts harmful pests |
| Potatoes | Competes for nutrients |
| Carrots | Can stunt growth |
By avoiding these conflicting plants, you can create a thriving environment for your corn. Monitor your garden carefully for the best results.
Seasonal Care Tips
Growing corn in a raised bed can be rewarding and fun. Seasonal care tips help ensure healthy plants and a bountiful harvest. This guide covers essential spring preparation and fall cleanup tasks. Follow these tips to maximize your corn yield.
Spring Preparation
Spring is the perfect time to prepare your raised bed for corn planting. Start by clearing the area of any weeds or debris. This step ensures your corn plants have enough nutrients and space to grow. Here are some key tasks:
- Test the soil: Use a soil test kit to check pH and nutrient levels.
- Amend the soil: Add compost or well-rotted manure to improve fertility.
- Choose the right corn variety: Select sweet corn or popcorn based on your taste.
- Plan your layout: Space your corn plants about 12 inches apart.
Consider planting corn in blocks rather than rows. This method improves pollination. Here’s a simple table to help you plan your planting:
| Variety | Spacing | Days to Harvest |
| Sweet Corn | 12 inches | 70-100 days |
| Popcorn | 12 inches | 90-120 days |
Water your raised bed after planting. Keep the soil moist but not soggy. Monitor for pests and diseases regularly. Early detection helps prevent major issues.
Fall Cleanup
Fall cleanup is vital for the health of your raised bed. After harvesting, remove all corn stalks and debris. This practice helps prevent diseases from lingering in the soil. Follow these steps for effective cleanup:
- Remove old plants: Pull out all corn stalks and roots.
- Compost healthy plant material: Add it to your compost pile.
- Discard diseased plants: Throw them away to avoid soil contamination.
- Test the soil again: Assess nutrient levels for the next growing season.
Consider covering your raised bed with mulch. Mulch protects the soil during winter. Here’s a simple checklist for your fall cleanup:
- Clear old plants.
- Compost healthy materials.
- Dispose of diseased plants.
- Test soil nutrients.
- Apply mulch.
These tasks help prepare your raised bed for winter. Healthy soil will ensure a great start next spring.
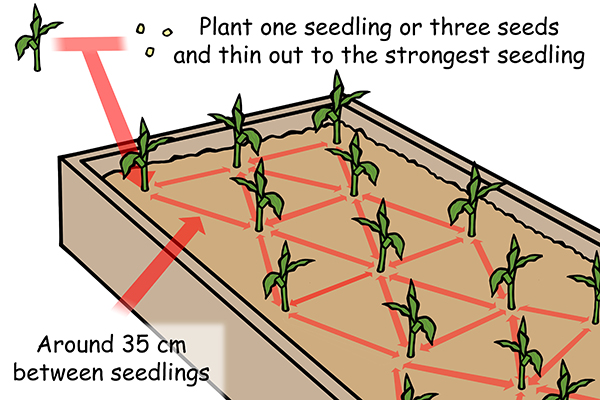
Credit: urbanfoodgarden.org
Common Mistakes
Growing corn in a raised bed can be rewarding. However, many gardeners make common mistakes that affect their harvest. Understanding these mistakes can help you grow healthy corn. Let’s explore two major pitfalls: overwatering and poor spacing.
Overwatering
Overwatering is a frequent error when growing corn. Corn requires a balance of moisture. Too much water can lead to root rot and other issues.
Here are some signs of overwatering:
- Yellowing leaves: Leaves turn yellow and droop.
- Wilting: Plants look weak and limp.
- Root rot: Roots become mushy and dark.
To avoid overwatering, follow these guidelines:
- Check the soil moisture regularly.
- Water only when the top inch of soil is dry.
- Ensure good drainage in your raised bed.
Use this simple table for watering tips:
| Soil Condition | Watering Frequency |
| Dry | Every 2-3 days |
| Moist | Every 4-5 days |
| Saturated | Do not water |
Remember, it’s easier to fix under-watering than overwatering. Monitor your plants closely for the best results.
Poor Spacing
Poor spacing is another common mistake. Corn plants need space to grow. Crowded plants compete for nutrients and sunlight.
Follow these spacing tips:
- Plant in rows: Space rows 30-36 inches apart.
- Space plants: Plant corn 12 inches apart within each row.
- Thin seedlings: Remove weaker plants after germination.
Use this simple table for spacing guidelines:
| Planting Method | Row Spacing | Plant Spacing |
| Traditional | 30-36 inches | 12 inches |
| Square Foot | 24 inches | 8-10 inches |
Proper spacing ensures strong growth and a bountiful harvest. Keep your corn plants healthy by giving them room to thrive.
Using Corn In Recipes
Growing corn in a raised bed is a fun and rewarding experience. It’s exciting to watch your plants thrive. Once harvested, corn can be used in many delicious recipes. This section explores how to enjoy your homegrown corn in fresh dishes and preserved options.
Fresh Dishes
Fresh corn is sweet and crunchy. It adds flavor to many meals. Here are some tasty ideas to use fresh corn:
- Fresh Corn Salad: Combine corn, tomatoes, cucumbers, and a light dressing.
- Grilled Corn on the Cob: Brush with butter and sprinkle with salt.
- Corn Chowder: A creamy soup with potatoes and bacon.
- Corn Tacos: Use fresh corn as a topping with beans and avocado.
Consider this simple recipe for Fresh Corn Salad:
| Ingredient | Quantity |
| Fresh Corn Kernels | 2 cups |
| Cherry Tomatoes | 1 cup, halved |
| Cucumber | 1, diced |
| Olive Oil | 2 tablespoons |
| Lemon Juice | 1 tablespoon |
| Salt and Pepper | to taste |
Mix all ingredients in a bowl. Serve chilled for a refreshing treat!
Preserved Options
Preserving corn allows you to enjoy its sweet taste all year. Here are ways to keep your corn tasty:
- Canning: Process corn in jars for long-term storage.
- Freezing: Blanch corn and store in freezer bags.
- Dried Corn: Dehydrate corn for snacks or soups.
Follow these steps for Canning Corn:
- Shuck and clean the corn.
- Cut the kernels off the cob.
- Fill sterilized jars with corn kernels.
- Add boiling water, leaving a little space at the top.
- Seal jars and process in a pressure canner.
Enjoy your preserved corn in soups, casseroles, or as a side dish!
Sustainability Practices
Growing corn in a raised bed is a great way to ensure healthy plants and bountiful harvests. Using sustainable practices helps the environment and enhances your garden’s productivity. By focusing on soil health and crop rotation, you can grow corn while protecting natural resources.
Soil Health
Healthy soil is the foundation of successful corn growth. It provides nutrients and supports strong root systems. Here are some key practices to maintain soil health:
- Use Organic Matter: Compost adds nutrients and improves soil structure.
- Test Soil pH: Corn thrives in soil with a pH of 6.0 to 6.8.
- Mulch: Organic mulches conserve moisture and suppress weeds.
- Reduce Chemical Use: Minimize synthetic fertilizers and pesticides.
Consider this simple table for organic materials to add to your soil:
| Material | Nutrient Benefits |
| Compost | Rich in nutrients and beneficial microbes |
| Manure | High in nitrogen and improves soil texture |
| Leaf Mold | Enhances moisture retention |
Regularly adding organic matter keeps your soil alive and productive. Rotate your compost every few months to aerate it. This practice helps create a nutrient-rich environment for your corn.
Crop Rotation
Crop rotation is essential for sustainable corn farming. It prevents soil depletion and reduces pest problems. Changing the types of crops grown in your raised bed each year helps maintain soil fertility.
Here are some benefits of crop rotation:
- Breaks Pest Cycles: Rotating crops disrupts the life cycles of pests.
- Reduces Disease: Different plants can prevent soil-borne diseases.
- Enhances Nutrient Balance: Each crop has different nutrient needs.
Follow this simple rotation plan:
- Year 1: Plant corn.
- Year 2: Plant legumes (e.g., beans, peas).
- Year 3: Plant leafy greens (e.g., lettuce, spinach).
- Year 4: Plant root vegetables (e.g., carrots, beets).
By rotating crops, you help restore soil health and improve yields. This method promotes a balanced ecosystem in your raised bed garden.
Frequently Asked Questions For How to Grow Corn in a Raised Bed
How Much Space Does Corn Need In A Raised Bed?
Corn requires about 12 to 18 inches of space between plants. This spacing allows for optimal growth and airflow. Ensure your raised bed is at least 3 feet wide. This setup promotes healthy root development and minimizes competition for nutrients.
When Is The Best Time To Plant Corn?
The best time to plant corn is in late spring. Wait until soil temperatures reach at least 60°F. This timing ensures optimal germination and growth. Typically, planting occurs after the last frost date in your region. Monitor local weather to choose the perfect planting day.
How Often Should I Water Corn In A Raised Bed?
Water corn deeply once a week, especially during dry spells. Raised beds can dry out faster than traditional gardens. Ensure the soil remains consistently moist but not waterlogged. Corn needs about 1 inch of water weekly for healthy growth and development.
What Soil Type Is Best For Growing Corn?
Corn thrives in well-drained, loamy soil rich in organic matter. Aim for a soil pH between 6. 0 and 6. 8. This type of soil provides essential nutrients and good drainage. Amending your raised bed with compost can enhance soil quality and fertility significantly.
Conclusion
Growing corn in a raised bed can be rewarding and fun. With the right soil, spacing, and care, your plants will thrive. Remember to monitor for pests and provide adequate water. Enjoy the process, and soon you’ll be harvesting fresh corn right from your garden.
Happy gardening!