Quick Explain
- Plant garlic cloves pointy end up, flat end down, 2-4 inches deep and 4-6 inches apart in full sun, well-drained soil.
- Fall planting (September to November) produces the biggest bulbs; spring planting works but yields smaller heads.
- Always buy seed garlic from a garden supplier – grocery store garlic is chemically treated to stop sprouting.
- Hardneck varieties suit cold climates; softneck varieties grow better in warm climates and store longer.
- Garlic takes 8-9 months from clove to harvest; expect to dig bulbs in June or July when half the leaves turn brown.
What Is Seed Garlic and Why You Can’t Use Grocery Store Cloves
Seed garlic is garlic grown specifically for planting – not the same as what you find in the produce aisle. Grocery store garlic is typically treated with a growth inhibitor that prevents it from sprouting on the shelf.
That same treatment stops it from growing properly in your garden (Ohio State University Extension, 2023).
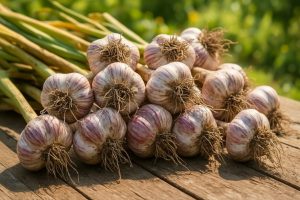
Seed garlic from a reputable garden supplier or local grower is certified disease-free, suited to your region, and selected for large bulb size.
It also gives you access to hundreds of flavor varieties far beyond the single bland type most supermarkets carry. Buy seed garlic in late summer or early fall, when suppliers stock fresh bulbs for the planting season.
Hardneck vs Softneck Garlic: Which Type Should You Plant?
Choosing the wrong garlic type for your climate is the most common planting mistake. Here is how to pick the right one:
Hardneck garlic (Allium sativum var. ophioscorodon) grows best in cold climates with winters below 32°F.
It produces fewer but larger cloves that peel easily, grows a flower stalk called a scape in spring, and stores for 4-6 months. Popular hardneck varieties include Rocambole, Porcelain, and Purple Stripe.
Softneck garlic (Allium sativum var. sativum) thrives in mild-winter climates and warm regions. It has no scape, produces more cloves per bulb, and stores for up to 12 months – which is why softneck is what you find in supermarkets.
It can also be braided for storage. Artichoke and Silverskin are the two most common softneck types.
Elephant garlic (Allium ampeloprasum) is technically a leek, not true garlic, but it grows similarly and does well in warmer climates where hardneck garlic struggles. Its flavor is milder and its cloves are much larger.
| Type | Best Climate | Cloves per Bulb | Storage Life | Has Scapes? |
| Hardneck | Cold winters (below 32°F) | 4-8 large cloves | 4-6 months | Yes |
| Softneck | Mild/warm winters | 8-20 smaller cloves | 9-12 months | No |
| Elephant | Warm climates | 4-6 very large cloves | 3-6 months | Sometimes |
When to Plant Garlic Cloves: Fall vs Spring
Fall planting produces the largest, most flavorful bulbs. Plant garlic in late September through November in most climates – specifically 4-6 weeks before the ground freezes hard.
This gives cloves time to establish roots before winter dormancy, and when temperatures warm in spring, the plant already has a strong foundation and takes off quickly (Old Farmer’s Almanac, 2025).
In the United States, timing by region breaks down like this:
- Northern states (zones 3-5): Plant late September to mid-October
- Mid-Atlantic and Midwest (zones 6-7): Plant October through early November
- Southern states and mild climates (zones 8-10): Plant November through December, or early spring
Spring planting is possible but produces smaller bulbs because the plants have less time to develop before summer heat arrives.
If you missed the fall window, plant as early as the soil can be worked – late February to March in most regions.
You can still harvest scapes from hardneck varieties and get a decent yield, just not the enormous heads fall planting delivers.
Learn More About: When to Plant Garlic in Colorado
What You Need Before You Start
- Seed garlic bulbs (not grocery store garlic)
- Well-drained garden bed, raised bed, or large containers (at least 8 inches deep)
- Compost or aged manure
- A balanced fertilizer: 5-10-10 granular, bonemeal, or fish meal (Old Farmer’s Almanac, 2025)
- Garden trowel or Hori Hori knife
- Straw, shredded leaves, or grass clippings for mulch
How to Prepare Your Soil for Garlic
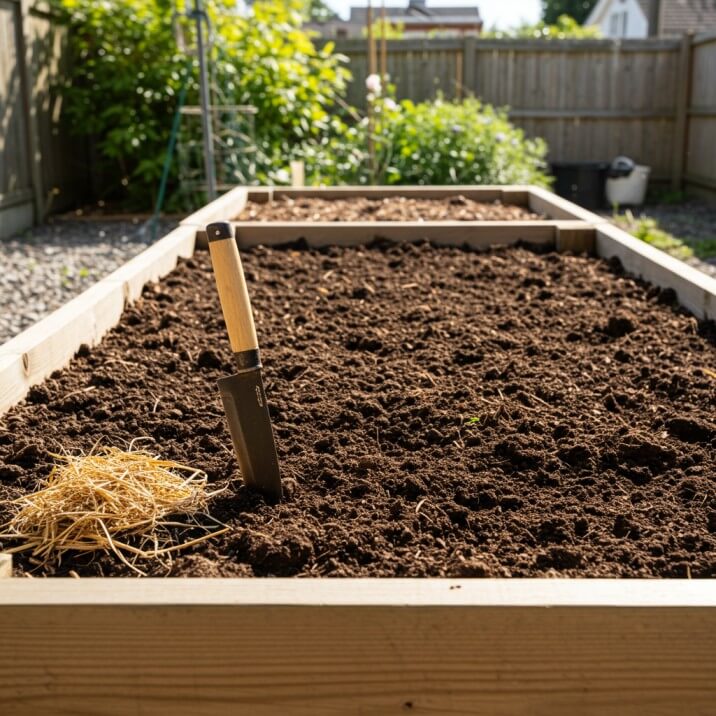
Good soil is the single biggest factor in bulb size. Garlic grows best in loose, fertile, well-drained soil with a pH of 6.0-7.0. Clay soil holds too much water and causes rot; compacted soil prevents bulbs from expanding fully.
Step 1 – Clear the bed. Remove all weeds, rocks, and thick roots. Garlic competes poorly with weeds; any competition during bulb formation reduces your yield significantly.
Step 2 – Loosen the soil. Dig or turn the bed to a depth of 8-10 inches. This loosening is what allows cloves to push roots down quickly and gives the expanding bulb room to grow.
Step 3 – Add organic matter. Work in 2-3 inches of compost or aged manure. This improves drainage in clay soil, improves moisture retention in sandy soil, and feeds the slow-release microbial activity that garlic roots rely on.
Step 4 – Add fertilizer. Work 2 tablespoons of 5-10-10 complete fertilizer, bonemeal, or fish meal into the soil a few inches below where the base of the cloves will sit (Old Farmer’s Almanac, 2025).
Garlic is a heavy feeder, and front-loading nutrients into the planting zone pays off at harvest.
Raised beds are excellent for garlic because they drain naturally and warm faster in spring. If your ground drains poorly, a raised bed is worth building.
Step-by-Step: How to Plant Garlic Cloves
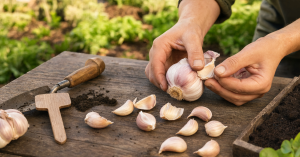
Step 1 – Break the Bulb into Cloves
Separate your garlic head into individual cloves on the day you plant – or at most one to two days before. Once cloves separate from the basal plate (the flat root end), they begin to deteriorate.
Leave the papery skin on each clove; removing it makes cloves more vulnerable to rot and mildew underground (Gardenary, 2026).
Select only the largest, firmest cloves for planting. The bigger the clove you put in the ground, the bigger the head you will pull out next summer.
Save the small cloves for your kitchen – they are not worth planting because they produce small, underdeveloped bulbs.
Step 2 – (Optional) Do a Pre-Plant Fertilizer Soak
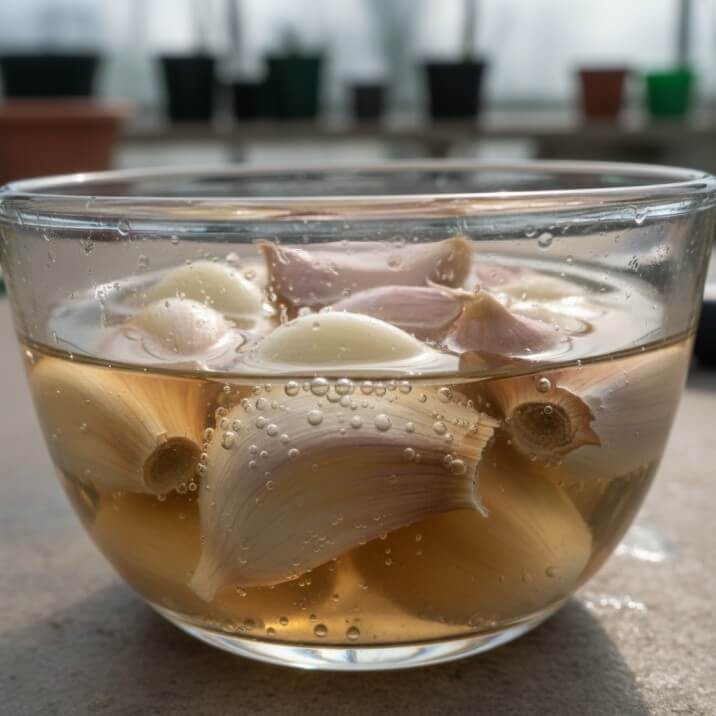
This step is skipped by most guides but makes a measurable difference: soak your cloves in a diluted fish emulsion fertilizer solution for 30 minutes to overnight before planting.
A comparison by Keene Organics (2025) showed cloves that went through the fertilizer soak developed roots measurably faster than unsoaked cloves from the same bulb – giving plants a head start before winter sets in.
To do it: mix fish emulsion at the dilution rate on the label, add 1 teaspoon of baking soda per gallon of water, and soak cloves.
Do not exceed 3 days of soaking; after that, delicate roots may start forming and can break during planting.
This step is not mandatory – millions of gardeners skip it and grow excellent garlic. But if you want every possible advantage, it is worth the 30 minutes.
Step 3 – Dig Your Planting Holes
For fall planting in cold climates: dig holes 4 inches deep. The extra soil depth provides insulation against winter freeze-thaw cycles.
For spring planting or mild climates: 2-3 inches deep is enough.
Space holes 4-6 inches apart within a row, and 6-12 inches between rows. Wider spacing (6+ inches) produces larger heads because each plant has more room to develop (The Beginner’s Garden, 2025).
Tight planting at 4 inches is fine for smaller beds but will give you smaller bulbs.
Step 4 – Plant Cloves the Right Way Up
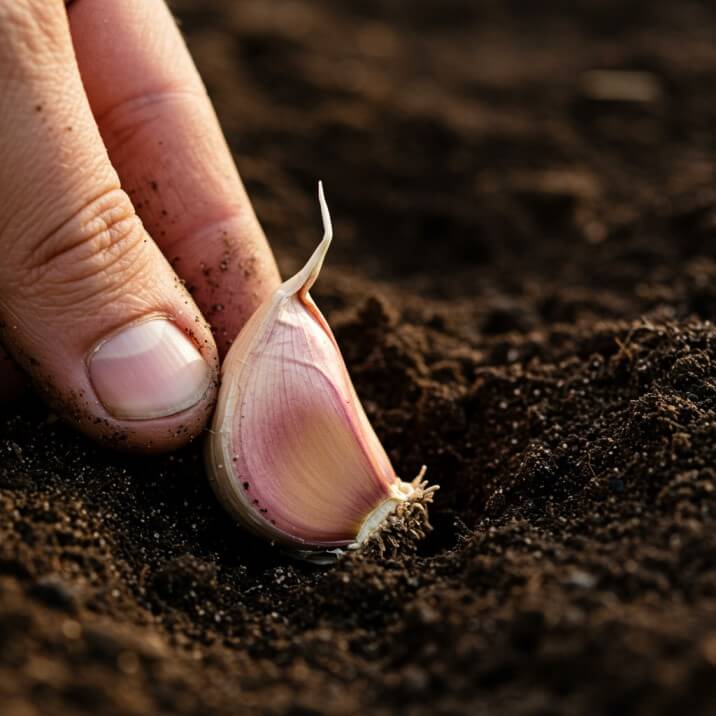
Place each clove with the flat, root end (basal plate) down and the pointed tip up. This orientation is not optional – a clove planted upside down will still grow, but it will expend energy correcting itself and produce a weaker plant.
Cover cloves with soil and press down gently to eliminate air pockets around the clove.
Step 5 – Water and Mulch
Water the bed thoroughly after planting. Then apply a 4-6 inch layer of straw, shredded leaves, or grass clippings over the entire bed.
Mulch does three jobs: it insulates cloves from temperature swings in winter, suppresses weeds during spring growth, and retains soil moisture so you water less. In harsh-winter climates, mulching is not optional – it can mean the difference between a full crop and winter-killed cloves.
How to Care for Garlic After Planting
Winter
Garlic sits dormant under the mulch. You do not need to water or fertilize during this period. Expect to see green shoots emerge above the mulch in early spring, sometimes while snow is still on the ground.
Spring
Once shoots reach 4-5 inches tall, pull back the mulch so sunlight can reach the soil. Side-dress the bed with a nitrogen-rich fertilizer or a layer of compost to fuel the rapid leafing-out phase.
More leaves means more photosynthesis, which means a larger bulb. Stop all nitrogen fertilization by late spring – once bulb formation begins, excess nitrogen drives leaf growth at the expense of bulb development.
Water consistently through spring and early summer. Garlic roots are shallow (roughly 12 inches deep), so they dry out faster than deep-rooted plants.
Drought stress during bulb development directly reduces bulb size and yield (Utah State University Extension, 2023). Aim to keep soil evenly moist but never waterlogged.
What Are Garlic Scapes and What to Do With Them
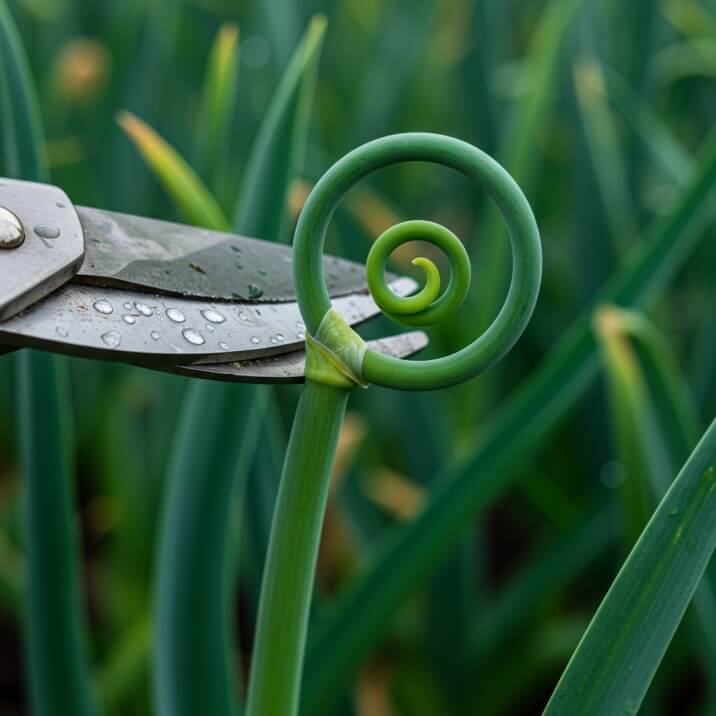
Hardneck garlic sends up a scape in late May or early June – a curling, cylindrical green stalk that emerges from the top of the plant and forms a loop before straightening out.
Cut scapes off when they have formed one full curl. Leaving them on redirects the plant’s energy into producing seeds rather than bulb, and removing them can increase final bulb size by up to 30% (GrowVeg, 2024).
Garlic scapes are completely edible and genuinely delicious. Their flavor is milder than garlic cloves. Use them in stir-fries, scrambled eggs, pesto, or sauté them in butter.
They can also be chopped, blanched for 3 minutes, and frozen – one tablespoon of frozen chopped scapes equals roughly one medium clove in cooking (GrowVeg, 2024).
Softneck garlic does not produce scapes.
How to Grow Garlic in Containers and Pots
Container growing is a gap most guides ignore. If you have no garden bed or live in an apartment with a balcony, you can absolutely grow full-sized garlic bulbs in pots.
Container size: Use a pot at least 8 inches deep and wide enough to space cloves 4-6 inches apart. A 12-inch pot fits 4-5 cloves comfortably.
Soil: Fill with well-draining potting mix enriched with compost. Do not use garden soil alone – it compacts in containers and restricts root growth. Target a pH of 6.0-7.0.
Variety selection: Softneck garlic works better in warm-climate containers because it tolerates mild winters. If you want to grow hardneck garlic in a container and your winters don’t drop below 45°F for at least 6-8 weeks, pre-chill the bulbs in a paper bag in your refrigerator crisper drawer for 8 weeks before planting.
This cold period – called vernalization – triggers the internal clock that tells garlic to form a full bulb rather than a single round clove (Savvy Gardening, 2020).
Light: Place containers in full sun, minimum 6 hours per day. In hot climates, choose a light-colored container – black pots absorb heat and can overheat the soil, stressing roots.
Watering: Containers dry out faster than in-ground beds. Check soil moisture every 1-2 days in warm weather. Water when the top inch feels dry, and water until it drains from the bottom.
How to Harvest, Cure, and Store Garlic
When to Harvest
Stop watering garlic 2 weeks before harvest. Garlic is ready to dig when half the leaves have turned brown but the top half is still green.
Most plants have 7-9 leaves total – when the bottom 3-4 are brown and the upper ones are still standing, harvest time has arrived (GrowVeg, 2024).
Do not wait until all leaves are brown. Over-mature bulbs split open underground, which ruins their storage life. Harvest a little early rather than a little late.
Hardneck garlic is typically ready about 20 days after scapes are removed.
How to Harvest
Use a garden fork or trowel to loosen the soil 4-6 inches from the stem before pulling. Yanking stems directly often snaps them, leaving the bulb underground.
Lift bulbs gently, brush off loose soil, and do not wash them – moisture at this stage leads to rot.
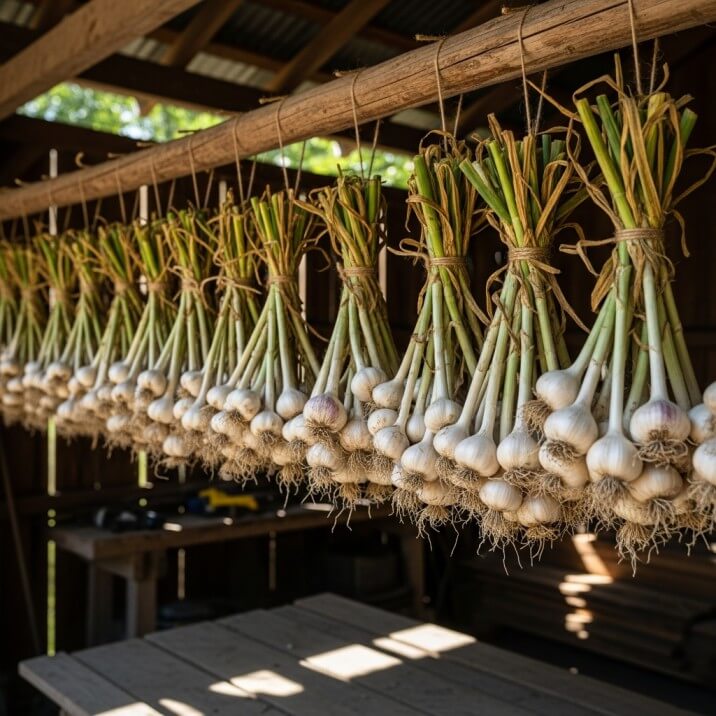
Curing Garlic
Fresh-dug garlic needs 2-4 weeks of curing before storage. Hang or lay bulbs in a warm, shaded, well-ventilated area – a covered porch, barn, or garage works well.
Leave the stems and roots on during curing. Curing dries the outer wrappers tight and extends storage life significantly. Do not seal garlic in plastic bags at any stage – it will sprout and spoil.
Storing Cured Garlic
- Hardneck garlic: Store at 55-65°F with 60-65% humidity. Stores for 4-6 months (The Art of Doing Stuff, 2025).
- Softneck garlic: Store in mesh bags or braided. Keeps 9-12 months under the same conditions.
- Avoid the refrigerator: Cold temperatures below 40°F trigger sprouting.
- Freezing: Separate cloves (leave skins on) and freeze in an airtight container for long-term storage.
- Garlic powder: Slice cured cloves thin, dehydrate at 125°F until brittle, and grind into powder.
- Planting grocery store garlic: Supermarket bulbs are treated with a sprouting inhibitor and may carry diseases not screened for in home gardens. Always use certified seed garlic.
- Planting cloves upside down: The pointed tip goes up. Reversed cloves still grow but waste energy correcting direction underground.
- Planting small cloves: Small cloves produce small bulbs. Save the large cloves for planting and use the small ones in the kitchen.
- Skipping mulch in cold climates: Unprotected cloves in zones 3-5 can be killed by hard freezes. A 4-6 inch mulch layer is cheap insurance.
- Watering too late in the season: Stop watering 2 weeks before harvest. Water left in the soil at harvest time delays curing and causes rot during storage.
- Harvesting too late: Over-mature bulbs crack open and will not store. When in doubt, harvest a few days early.
- Breaking the bulb apart too early: Separate cloves on planting day. Cloves start deteriorating once removed from the basal plate.
5 Best Growing Garlic Cloves Guides
Most top-ranking guides cover the basics well but leave out several things that matter to real growers:
The pre-plant soak is almost never mentioned. The root-development advantage is documented and costs nothing except 30 minutes.
Vernalization for warm-climate growers is rarely explained. If you live somewhere without cold winters – Bangladesh, Florida, Southern California – you cannot just plant hardneck garlic and expect results. Y
ou need either softneck varieties or a deliberate cold treatment in your refrigerator. Most guides ignore this entirely, which leads to failed crops in tropical and subtropical regions.
Container growing with a vernalization hack is skimmed over. The fridge pre-chill method for hardneck garlic in warm climates opens up variety options that most warm-climate guides say are impossible.
What to actually do with scapes goes unexplained beyond “cut them off.” They are a genuinely useful ingredient with a short seasonal window, and most people don’t know they can be frozen.
Clove selection math is never spelled out: the size of the clove directly determines the size of the final head. Using small cloves to “not waste” them is a common beginner mistake that results in disappointing harvests.
Frequently Asked Questions About Planting Garlic Cloves
What is the right depth to plant garlic cloves?
Plant garlic cloves 2-3 inches deep in mild climates, and 4 inches deep in cold climates where the ground freezes hard. The deeper planting in cold zones protects cloves from freeze-thaw damage and gives better insulation through winter.
Which end of the garlic clove goes in the ground?
The flat, blunt end (the basal plate) goes down; the pointed tip goes up. Roots grow from the flat bottom, and leaves emerge from the pointed top. Planting upside down produces a weaker plant that wastes energy correcting its orientation underground.
Can I plant garlic from the grocery store?
Grocery store garlic is treated with a chemical inhibitor to prevent sprouting during storage. This treatment reduces germination rates and may carry diseases not screened for in commercial produce settings. Always buy certified seed garlic from a garden center or reputable mail-order supplier.
When is the best time to plant garlic cloves?
Fall is best – September through November in most of North America, timed 4-6 weeks before hard frost. Fall planting gives cloves a long root-establishment period over winter, resulting in larger bulbs the following summer. Spring planting is possible but produces smaller heads.
How far apart should garlic cloves be planted?
Space cloves 4-6 inches apart within a row, with 6-12 inches between rows. Wider spacing produces larger bulbs because each plant has more room to develop underground. Tight spacing at 4 inches is workable in small beds but typically yields smaller heads.
How do I know when garlic is ready to harvest?
Harvest when roughly half the leaves (the lower ones) have turned brown and the upper leaves are still green. Most garlic plants have 7-9 leaves; harvest when 3-4 of the bottom leaves are brown. Harvesting when all leaves are green means the bulb is not fully developed. Waiting until all leaves are brown means the bulb has over-matured and split – which ruins storage life.
How long does garlic take from planting to harvest?
Fall-planted garlic takes approximately 8-9 months from planting to harvest. Spring-planted garlic takes 4-5 months but produces smaller bulbs. Container-grown garlic in a heated indoor environment can be harvested in roughly 4-6 months, though indoor bulbs are smaller than garden-grown ones.
Can I grow garlic in a warm climate or tropical country?
Yes, but you need softneck varieties rather than hardneck. Softneck garlic does not require cold dormancy to form a full bulb. If you want to grow hardneck varieties in a warm climate, pre-chill whole bulbs in your refrigerator crisper (at 35-40°F) for 8 weeks before planting – this simulates the cold dormancy period the plant needs (Savvy Gardening, 2020). Elephant garlic also grows well in warm climates with minimal chill requirement.
Key Takeaways
- Plant the largest cloves only – clove size directly determines final bulb size.
- Fall planting in cold climates always outperforms spring planting for bulb size and flavor.
- Always use certified seed garlic; grocery store bulbs are treated to prevent sprouting.
- Mulch every fall planting with 4-6 inches of straw or shredded leaves – it protects cloves in winter and suppresses weeds in spring.
- Cut hardneck scapes when they form one full curl; this alone can increase bulb size by up to 30%.
- Harvest when half the leaves are brown, cure for 2-4 weeks, and store in a cool, ventilated spot – never in a sealed plastic bag or refrigerator.